
Bongo drum, handmade
 While attempting to create a whole drum kit by hand using Photoshop a few months ago I created this bongo drum, which sound I find quite satisfactory. It was accomplished by loading a few bongo drum samples in Photosounder to see how a bongo drum typically looks like, and then recreating what I saw in Photoshop.
A handmade bongo drum
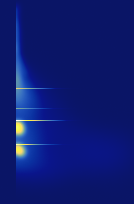
There are 3 main features, as shown on the picture to the right : a few carefully spaced horizontal lines that give the bongo drum its characteristic metallic ringing sort of sound,
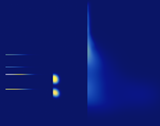 two short bright blobs placed at the beginning of the sound under the two lowest lines which give the sound its initial punch, and finally a darker snare-like haze which give the initial slappy-almost-clicky start and evolves in vertical span and intensity to sound like the ringing from kicking into a barrel. Of course on top of it all we find a black rectangle which overlays the first half of what we drew as to give our sound its sharp attack. The 3 separate features as show on the image sound like this (played at 205 pixels/second) :
Full original multi-layered Photoshop file
Labels: experiments, image synthesis, instrument creation
posted by Michel Rouzic at
12:22
0 Comments
Links to this post
![]()
![]()
 Note that when you're done, you might want to double-pass the processing to obtain a result more faithful to the actual image you obtained. To do that, normally load the image in lossless mode in